|
Another novel idea of the Improvisation Center, the solar powered outdoor light. This idea was conjured up after
going for so long without an outdoor light over our driveway area. It originally started with the notion that we're
too cheap to pay the power company a monthly fee to have one of those power pole mounted sodium vapor lights set up to cover
the driveway side of the house. Besides, those things stay on ALL night, and with our window right in the area where
the light would be shining, the last thing we want is one of those lights glaring through the window.
With the area being dark as a result, we've had to use flashlights to navigate the short walk between the driveway and
the porch when returning home at night. We looked at the idea of putting a regular light on a pole over the driveway
and just hooking it up to the mains power light everything else, but then we got to looking around, and made note of the solar
panel set that we had from another project that we had long since disasssembled. The panel set was doing nothing but
taking up room in the yard and it was too small in and of itself to really serve any large scale purpose. Secondly we
had a few extra power inverters that weren't serving any purpose other than taking up room in the shed. Along with other
extra junk like scrap wood, extra home electrical components (boxes, light fixtures, outlets, etc), and the desire to have
an outdoor light as well as some form of alternate energy that serves a practical purpose around the homestead, the idea for
the solar powered area light/power supply came to fruition.
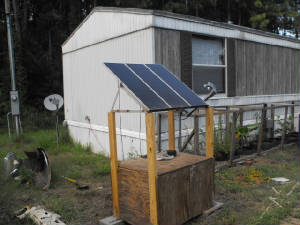
The over all idea will be that the innards of the unit (inverter, battery, etc) will be mounted in a wooden crate that
will be anchored to masonry blocks that will keep the crate off the ground, while the solar array will be mounted approx 5
ft off the ground, above the crate. The area light fixture will be a CF fixture that will be mounted atop a 10-12 ft
pole that will be bolted into another pole that will be anchored in a hole right behind the crate with concrete, to facilitate
easy removal to service the fixture. In addition, the fixture will be one of those dusk/dawn fixtures so it'll only
be able to come on at night, regardless of what we set the timer for, which as the next addition, will be set up to only turn
the light on later at night when I come home from the job, for a couple of hours to give me the time to get home and have
a light on for me to make it to the house, while being programmed on the weekends to come on at a different time, to give
us light when we typically come home after a night of making our payday runs. Setting it up this way will allow us to
accomplish the goal of getting light to the area without wasting power, and allowing the small solar array to recharge the
battery bank more effectively. The last addition to the unit will be an outdoor outlet that will also be hooked up to
the inverter, mainly as a feel good feature that, in a pinch, would allow us to have off grid power (albeit very limited)
in case of an emergency.
We started off with a crate made mostly from extra plywood and some 2x4's that were left over from our last chicken coop
project. The crate is approximately 3 ft long, 2 ft high and 2 ft wide. One side was made to be open to access
the inside. The vertical 2x4's on the crate are actually 4 ft long, which when the solar array is mounted will put the
top of the array at over 5 ft high.
After building the crate, I welded up the cheap frame that was used to mount the solar panels and bolted the frame to
the top of the 2x4's, then after mounting the panels, used a couple of 90 degree angle braces on either end to further secure
the end panels. This set up has already proven to withstand some hard winds that had passed through the area recently.
From there an outlet box was mounted inside the crate , with a short cable made from a plug cut from a broken appliance,
to be plugged into the inverter outlet then hardwired into the outlet box. A hole was drilled behind the outlet box
to the outside of the crate where the outdoor outlet will go.
|
|
|
| Shot of crate with solar array mounted in place |
|
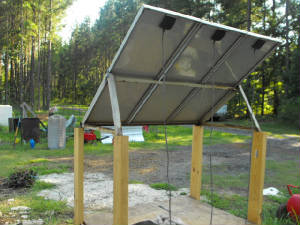
| Shot of rear of panel mount to show how it sets on 2x4's |
The next thing is the outdoor outlet. This little piece utilizes a covered outlet plate that is sealed
with a gasket to keep moisture out. The box is a heavy duty plastic that won't rust or wick moisture through it, also
sealed with a gasket where the cover mounts to the box. Upon installing the box on the side of the crate over the hole
feeding the cable out from the interior outlet, I applied a thick bead of caulk around the box where it meets the plywood
board to further seal everything up to keep moisture out.
With the addition of the outlet, the next few things that were done were more involved with electronics.
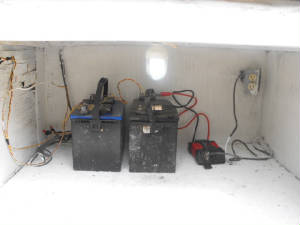
With the addition of a couple of marine batteries, I needed a means to control the current going to the batteries from the
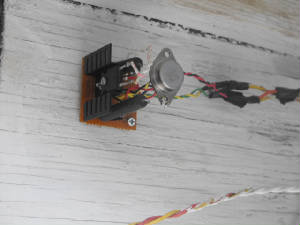
panels. Being of the cheap sort, I wasn't about to go buy a charge controller so I went online and found a schematic
for a relatively low current charge controller that would handle the couple amps or so of power from the panels. This
little circuit was mounted on the side to keep it out of the way. The next thing to go with the homemade charge controller
was a fan to keep the power transistor cool.
I built the fan circuit to be a lght activated circuit utilizing a photocell. When there's daylight, the
fan comes on, night time, fan goes off. It's a simple transistor circuit controlling a computer fan mounted next to
the charge controller to blow air over the circuit and power transistor.
The last thing added was a simple light fixture for a 12v fluorescent light bulb. This is to be used for
when we have to service something within the box when its dark. Everything is wired to the battery bank and ready to
put online.
|
| Shot of charge controller circuit, note power transistor |
|
| Shot of interior of box, note 12v CFL shining. |
|


