|
Preface:
At this point, I had managed to do some floor patching to this car when it was back in Chicago some 8 years ago, since
the floors were in bad shape in spots, bad enough that you could almost put your foot through the floors and turn the car
into a Flintstone mobile. That repair consisted of some sheet metal patching, backed up with some roofing tar to cover
it. The roofing tar was almost the consistency of super thick peanut butter, it was already drying up in the bucket,
which made it just right for this application, as it dried up to a nice super dense yet pliable material that coated the floors
from the outside, helping to protect it from the elements.
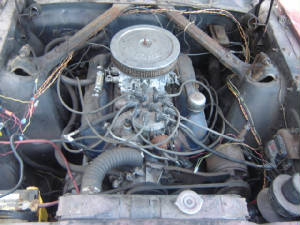
The other main thing that we did to this vehicle was the rebuilding of the engine and transmission. The engine
of course, was modified, with the usual line up of higher lift camshaft, performance intake, Edelbrock performer 4 bbl carb,
headers with 2" exhaust all the way back, a Holly high flow electrc fuel pump, a Duraspark ignition system with a higher voltage
coil from a 90's Ford V8 car, and a higher stall speed torque converter for the transmission.
The engine last ran pretty good and the transmission engaged just fine. We were kind of worried about the condition
of the engine and transmission sitting so long without having been run in over 3 years. A preliminary check of the oil
showed that it was still oil and not that milkshake looking shit that would've indicated the presence of water. Replacement
of the battery and a mild cranking of the engine also shown that both the starter and the engine were not rusted or otherwise
seized up, the both turned over just fine.
Going to the back, of course the fuel in the tank was almost worthless as a motor fuel, so we went to drain it, but in
the process of trying to remove the hose from the sending unit in the tank, the nipple broke away due to rust. With
that we drained as much of the old fuel out as we could, storing it in jugs to use for accelerant to burn garbage, then removed
the tank. The tank does have some surface rust on it, but we will see if we can salvage the tank and just replace the
sending unit before shelling out $100+ for a replacement tank and sending unit.
|
| Shot of engine, note performance items in place |
The next thing that we noticed was that the right frame rail was rusted away where the rear shackle for the leaf spring
attaches, which sucks as thats a stress point in the frame. That was going to wait for another day as there were a few
other easier things we could do first.
One of the things we had to do was reassemble the gauge panel, well really just put it back into the hole in the dash
as it was removed when we did a little work with the wiring sometime in the past. We had to make sure the indicator
lights still came on when the car was turned on, which they did. With the reassembly of the gauge panel, the next thing
was checking the brake lights for proper operation. We did a little tidying up of the wiring in the trunk for the taillights
and brake lights, and found that both worked. We did have to replace one headlight bulb and reseat the plug on the other,
so those checked out just as well.
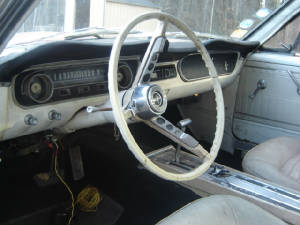
The next thing was installing a fresh radio. The radio on board was the car's original 8 track radio, cool from
a nostalgia perspective but otherwise useless to us. That unit came out and after some trimming of the dash hole, a
new CD stereo went in place. Because of the flaky wiring with the ignition key switch, we will end up installing a toggle
switch to turn off the engine electrical components when we just want the radio on. This is the same kind of setup thats
done with the 69 mustang, a toggle switch kills the fuel pump and ignition system so they don't drain the battery further
when the engine isn't running.
|
| Shot of interior, look closely and see CD radio in place |
2-21-10:
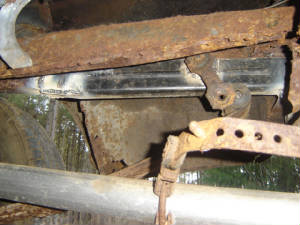
At this point, we managed to do the repairs to the frame rail that were mentioned before. This involved cutting
out all of the rusted metal from the area, then removing the bushing holder from the spring shackle for future use.
Afterward, a replacement frame rail was welded up from some scrap metal we had. Next the bushing holder was cleaned
up of rusty metal until all that was left was a round metal bushing, then an opening was cut into the replacement rail in
the location where the shackle lined up with, so I can weld in the bushing on the new frame rail piece. With the bushing
welded in place, we were able to put the replacement frame rail up into position, putting the spring shackle back together
before doing the final assembly.
We had to do some extra cutting and hammering to get the rail to fit in as best as possible, as there was actually a
slight curve in the rail, it wasn't a perfect straight rail. With the last minute "fitting", I was then ready to do
the welding. I managed to weld the front part of the replacement rail to the old frame, which was ground to bare metal
beforehand, then weld along the top of the frame to give the rail further strength. I couldn't finish welding one of
the top sides of the new frame rail as I ran out of welding wire, but not before having put some weld beads on the back side
of the frame rail, attaching it to the rear parts of the floor. When we get some replacement welding wire, we will also
get some angle iron, and bolt it to the floor underneath, then weld the bottom part of the angle iron to the side of the frame
rail to give the rail and the floor alike, extra strength.
Even right now the frame rail is supporting the spring after letting the car back down on the repaired setup. Of
course that doesn't mean its ready to take the ravages of these bumpy country roads however, more reinforcement is needed.
|
| Welded up frame rail in place |
The last thing that was done on this episode was the replacement of the rims on the car. Beforehand, this car had
a mixture of different rims on it. The rims that used to be on it were removed and used on the 69 mustang, as those
rims were the only 14" rims that would fit on the large front disc brakes that were added to the car many years ago.
This car had two of the 69's old rims on the front, one of which leaked, and a couple of 15" rims/tires from a junkyard car.
We then realized when we went back to the junkyard that maybe we need to gauge all of the different bolt patterns of
the rims on the Ford cars/trucks at the junkyard to see if something happens to have the same bolt pattern to the older Mustang's
bolt pattern. After finding that the Mustang had a 4 3/4" bolt pattern, we did a little checking, and found that 80's
Rangers had the same pattern, and oddly enough, even the Probe had the same bolt pattern too. Other cars like the Grand
Marquis and Crown Vic and LTD also had the same patterns, case in point, many 80's and even some 90's cars, had the same bolt
pattern as the old Mustang.
After looking around, the only vehicle that had a full set of the same rims on it was an 88 Ranger, the rims weren't
super plain Jane but they weren't flashy "get your attention" rims either, they had a fairly decent balance of style and quality.
So off came the four rims, and back home they went. We filled up the tires on the rims (one eventually leaked out within
a few hours) and put the four wheels on the Mustang.
We took the two 15" tires and put them on the tire pile for a possible future use, then took the one good 14" stock wheel
and put it on the Falcon EV, as that car had this one oddball rim that was wide as hell and could barely hold the tire that
it had on it. The oddball rim was then put into a pile next to the Falcon with two other 14" tires, and the leaky rim
from the Mustang was also put into that same pile, so those tires can be used later on for either the Mustang or the Falcon,
depending on our future choices and/or circumstances.
After moving the car down to the house where I do most of my work on vehicles, I surveyed the truck area first of all.
I found that the fuel tank needs to be replaced, it has several small rust holes in it, as well as a fair amount of loose
rust inside. I'll end up salvaging the sending unit to use in a new fuel tank (if the new tank doesn't come with one).
The next thing is the trunk floor. It's pretty rusted out and in need of replacing. Going on the idea of
improvisation, rather than spend several hundred on a complete trunk floor, I cut out all of the rusted metal and took some
sections of sheet metal that I have on hand from salvaged appliances and cut out sections to replace the bad metal.
Prior to welding in the sheet metal I had to cut and re-weld the right rear frame rail in a straighter position so the
spring shackles can sit straighter between the frame and the spring bushings. The studs on the old shackle were damaged
due to the frame not being centered with the spring on the right side. After welding the frame straight I installed
a replacement spring shackle and new bushings. With that I welded in the sheet metal to repair the trunk floor all around,
restoring that to a better shape than it ever was. Other than a little sealing to make everything a little water tight,
the trunk is ready for a new fuel tank.
|


